One of the best subjects to shoot is close up shots of tiny objects, which are less obvious to one’s eye. With a little effort and practice, macro photography can yield very intriguing photographs. Macro photography typically requires dedicated macro lenses, which more often than not are very expensive. So what does a photographer do if they can’t afford a dedicated macro lens? They use a technique known as the Reverse Lens Technique.
To understand how this works, one must understand how a lens works. The elements of a lens are arranged to capture light from a wide angle of view. The lens converges the incoming light and focuses it onto a much smaller plane. Now think about what would happen if you flipped the lens. Now the very small elements would diverge light coming in from a smaller source, which is exactly what we want when shooting tiny subjects.
Once the lens is flipped the only way to attach it to the camera is with an adapter ring that mounts to the camera body and then screws into the filter ring on what would normally be considered the front of the lens. In this case it is the back. Make sure that you are very careful using this technique because areas are not protected as well as normal. If you don’t have the adapter ring you can just hold the lens close to the camera but be very careful not to damage anything. Also I would recommend using a UV filter to protect the lens from scratching. This technique can yield very good results but it does take a lot of practice to learn how to focus properly.
Also due to the very small depth of field you can use a technique called focus stacking. You use a photo-editing program like Photoshop or Gimp and you take many pictures of the same subject but just focus on different sections so when you stack them together everything is in focus. Using a tripod makes this process much easier, because the photo needs to be the same distance but just focusing on a different section. I will try and talk more about focus stacking in a later post.
Important Information:
1. It’s best to use a wide aperture lens. The standard 50 mm lens is great. You can also use a standard kit lens. But the prime lenses work best.
2. The lenses’ aperture is no longer under the camera’s control.
3. Automatic controls like auto-focus and auto-metering won’t work. It's best to use manual focus.
4. Always protect your lens with a UV filter so you don’t scratch it.
5. Use external lighting, flash can work but sometimes it leaves undesirable lighting.
6. Depth of field is restricted so it is very hard to focus on the precise place you are trying to get in focus.
7. To focus you must move the camera back and fourth instead of focusing the lens.
Pros:
1. Inexpensive
2. Works well
3. Most people already have a small lens that comes with the camera body.
Cons:
1. Depth of field restricted.
2. No auto focus
3. No auto settings
4. Aperture no longer controlled by camera (if lens has manual aperture you can use that)
5. Harder to focus
6. Need External Lighting
Special Thanks:
Thanks to my roommate George Meyer for allowing me to take photographs of his eye using the reverse lens technique.
Please feel free to leave comments about any of the photographs I will try and respond as fast as I can. I normally check comments daily.
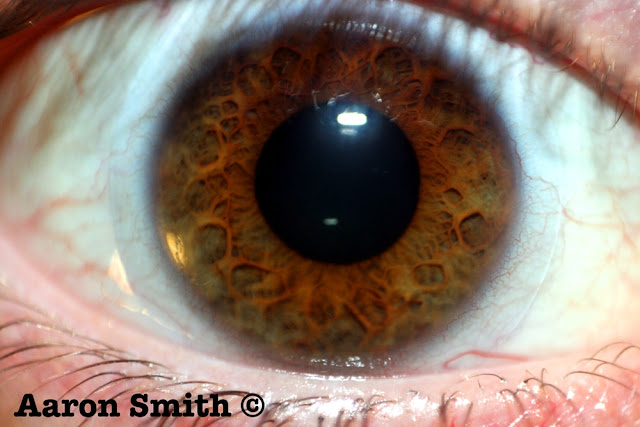 |
| George Meyer's Eye with 55mm reversed lens |
 |
| George Meyer's Eye 24mm reversed lens |
 |
| This is a good example of the small depth of field. You could improve this shot using the focus stacking technique. |
 |
| Photograph of one dollar bill. Another example of the small depth of field that could be improved using focus stacking. |